For all of you out there testing all the new Windows 8/Server 2012 goodness, you'll be happy to know Microsoft released RSAT for Windows 8. Download link is listed below.
http://www.microsoft.com/en-us/download/details.aspx?id=28972
Showing posts with label Microsoft. Show all posts
Showing posts with label Microsoft. Show all posts
Friday, September 14, 2012

Wednesday, July 18, 2012
Installing Office 2013 on Windows 8
I have been using Windows 8 for awhile now. It's OK. I'm not 100% sold on the metro view but its growing on me. I think the Slate will give Microsoft instant credibility in the mobile space. I got a hold of the Office 2013 preview and wanted to show how easy it was to install on Windows 8 (I'm using the 64bit version)You can download the tech preview at the link below. You will need a Windows Live account to get access to the .exe. Let's get started.
http://www.microsoft.com/office/preview/en
Step 1) Once you have signed up, you will be able to download the .exe. Double click the .exe to kick off the install wizard. An orange box will pop up and load some components and then the install wizard will start.

Step 2) On the "Welcome to Office" screen, simply click "Next" to continue.

Step 3) On the next screen you can choose whether or not to participate in the Microsoft Improvement Program (I chose No Thanks). Make your selection and click "Accept" to continue.

Step 4) A short promo video will play (about 15 seconds) and then continue onto the next screen.
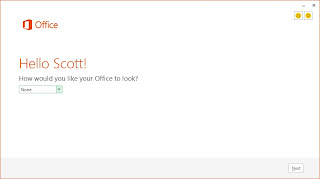
Select how you wish Office to appear. (I chose Clouds) Click "Next" to continue.

Step 5) The next screen will present you with an introduction to SkyDrive, which is Microsoft's version of Dropbox, Google Docs, etc. Click "Next" to continue.

Step 6) The next screen will ask if you would like to review more information about what's new in Office 2013. You can click "Take a look" if you want, or simply click "No Thanks" to continue.

Step 7) The install process will start and takes a couple minutes to complete. Once things are complete you will get to the "You're good to go" screen. Click "All done" to complete the install process. And that's it, Office 2013 is now installed! Congrats

From the Metro screen you will now have tiles for all the Office apps, (Excel, Access, Publisher, OneNote, Outlook, PowerPoint and Word) Below are a couple screen shots of Word 2013 and OneNote 2013. As you can see, it looks very similar to Office 2010. I will continue testing Office and post more findings in the future. Stay tuned.

 Word 2013
 OneNote 2013
http://www.microsoft.com/office/preview/en
Step 1) Once you have signed up, you will be able to download the .exe. Double click the .exe to kick off the install wizard. An orange box will pop up and load some components and then the install wizard will start.

Step 2) On the "Welcome to Office" screen, simply click "Next" to continue.

Step 3) On the next screen you can choose whether or not to participate in the Microsoft Improvement Program (I chose No Thanks). Make your selection and click "Accept" to continue.

Step 4) A short promo video will play (about 15 seconds) and then continue onto the next screen.
Select how you wish Office to appear. (I chose Clouds) Click "Next" to continue.


Step 5) The next screen will present you with an introduction to SkyDrive, which is Microsoft's version of Dropbox, Google Docs, etc. Click "Next" to continue.

Step 6) The next screen will ask if you would like to review more information about what's new in Office 2013. You can click "Take a look" if you want, or simply click "No Thanks" to continue.

Step 7) The install process will start and takes a couple minutes to complete. Once things are complete you will get to the "You're good to go" screen. Click "All done" to complete the install process. And that's it, Office 2013 is now installed! Congrats

From the Metro screen you will now have tiles for all the Office apps, (Excel, Access, Publisher, OneNote, Outlook, PowerPoint and Word) Below are a couple screen shots of Word 2013 and OneNote 2013. As you can see, it looks very similar to Office 2010. I will continue testing Office and post more findings in the future. Stay tuned.


Tuesday, June 12, 2012
XEN High Availability-Cluster V3 Windows Server 2012 live migration
Here is a great little video from Georg
Dörn where he demonstrates live migration in a Xen HA Cluster. Enjoy.
VIDEO: XEN High Availability-Cluster V3 Windows Server 2012 live migration
Tuesday, June 5, 2012
Enable Hyper-V on Windows Server 2012 RC
I finally got around to setting up a Windows 2012 Server in my home lab. Here is a simple step-by-step on enabling the new Hyper-V roll.
Step 1) From the new Server Manager "Dashboard" Click the "Add Roles and Features" Link

Step 2) Review the "Before you Begin" Screen and Click "Next"

Step 3) On the Installation Type screen Select "Role-Based or feature-based Installation" and Click "Next"
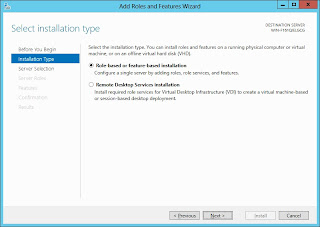
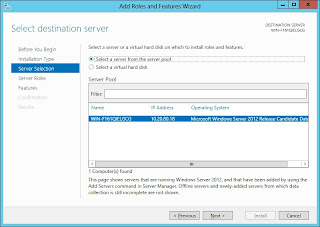
Step 4) On the Server Selection Scree, Select your local Server from the Server Pool (I only have one server)
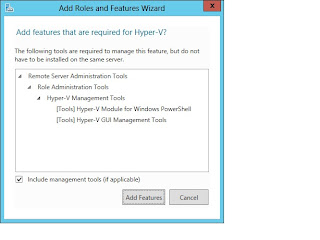
Step 5) A Pop-Up Screen will come up asking you to Add the RSAT (Remote Server Administration Tools) and Hyper-V Management Tools. Click "Add Features" to Continue.
Step 6) On the Server Roles Screen, Confirm that "Hyper-V" is Selected and Click "Next"

Step 7) The Hyper-V specific options are Next. Review the start screen and Click "Next" to continue.

Step 8) On the Virtual Switches Screen, Select the NIC you want to use as the Virtual Switch and Click "Next"

Step 9) On the Migration Screen, Select your desired Live Migration settings (This is a new feature) Note the warning message about migration settings in a cluster. Click "Next" to continue.

Step 10) On the Default Stores Screen, Select the Default locations for VM Hard Disk and Configuration Files. (I have local storage only but this could be shared storage) Click "Next" to Continue.

Step 11) On the Confirmation Screen, you have the Option to tick a box to Restart the host if a restart is required. You will get a Pop-Up Message if you select this Option, Click "OK" to continue.

Step 12) Once Hyper-V has been enabled, and the Server has Rebooted, you will see the Hyper-V Roles Installed on the Server Manager Dashboard.

Congrats!! Hyper-V is now enabled. Below are a couple screenshots of the new Hyper-V Settings Options. Notice some of the new settings, like Physical GPU's for RemoteFX, Live Migration options, and Storage Migrations settings. I will be playing around with these shortly. More to come. Cheers.


Step 1) From the new Server Manager "Dashboard" Click the "Add Roles and Features" Link

Step 2) Review the "Before you Begin" Screen and Click "Next"

Step 3) On the Installation Type screen Select "Role-Based or feature-based Installation" and Click "Next"

Step 4) On the Server Selection Scree, Select your local Server from the Server Pool (I only have one server)

Step 5) A Pop-Up Screen will come up asking you to Add the RSAT (Remote Server Administration Tools) and Hyper-V Management Tools. Click "Add Features" to Continue.

Step 6) On the Server Roles Screen, Confirm that "Hyper-V" is Selected and Click "Next"


Step 7) The Hyper-V specific options are Next. Review the start screen and Click "Next" to continue.

Step 8) On the Virtual Switches Screen, Select the NIC you want to use as the Virtual Switch and Click "Next"

Step 9) On the Migration Screen, Select your desired Live Migration settings (This is a new feature) Note the warning message about migration settings in a cluster. Click "Next" to continue.

Step 10) On the Default Stores Screen, Select the Default locations for VM Hard Disk and Configuration Files. (I have local storage only but this could be shared storage) Click "Next" to Continue.

Step 11) On the Confirmation Screen, you have the Option to tick a box to Restart the host if a restart is required. You will get a Pop-Up Message if you select this Option, Click "OK" to continue.

Step 12) Once Hyper-V has been enabled, and the Server has Rebooted, you will see the Hyper-V Roles Installed on the Server Manager Dashboard.

Congrats!! Hyper-V is now enabled. Below are a couple screenshots of the new Hyper-V Settings Options. Notice some of the new settings, like Physical GPU's for RemoteFX, Live Migration options, and Storage Migrations settings. I will be playing around with these shortly. More to come. Cheers.


Thursday, May 31, 2012
Wednesday, May 23, 2012
How to use Dell OpenManage to Verify BIOS requirements for Hyper-V
Background:
The Hyper-V Roll on Windows Server 2008 R2 requires certain Hardware settings
to be enabled in the host system BIOS, such as Intel VT and DEP. More
information can be found at: Hyper-VHardware Requirements However, with
Dell PowerEdge Servers, it is possible to utilize the OpenManage tool to
configure and verify BIOS settings, without having to reboot the server. Here’s
how….
Step 1) On the
Server you wish to enable Hyper-V, go to Start-->All
Programs-->Dell
OpenManage Applications and launch the “Server Administrator” tool (This will
open a browser)
*You will need an account that is part of the Local Admin
group of the server in order to have access to the Open Manage Console

Step 2) Once
the OpenManage Home page loads, you will want to navigate to the System-->BIOS menu on the left
hand side. Follow up by clicking on the “Setup” Tab on the top Menu Bar

Step 3) From
the Setup Menu you can verify that the following options are ENABLED:
Processor Virtualization Technology
Processor Logical Processor (HyperThreading)
Processor Execute Disabled

Step 4) If
options are not configured properly (i.e. Disabled) you can simply click on the
current setting on the right, and OpenManage will direct you to a screen where
you can change the settings. Be sure to click the “Apply Changes” button before
exiting the menu.

Step 5) You
can now “Log Out” and close the browser. At this point you should be good to
go. Proceed to Server Manager to enable the Hyper-V roll. For instructions on installing Hyper-V check
out: Hyper-VGetting Started Guide
Subscribe to:
Posts (Atom)